 |
| Lavender (Photo by bodhilens) |
Monday, May 21, 2012
Lavender


Wednesday, April 25, 2012
Redbud pickles, young bamboo shoots with seaweeds, and omelette with swiss chard and sweet mini peppers
Here are some nature-inspired, spontaneous, and delicious green witch projects that took place in Danville, KY, this early spring. They were made possible by Virginia, her family and friends. Thank you all.
Virginia's friend Fox let us dig a bagful of young bamboo shoots on her farm. Bodhilens planted a few shoots in our yard, and I cooked this traditional Japanese dish with the rest. It was such a rare treat that I had not eaten for ages. My mother was proud of me for making it from scratch. It is a lot of work peeling and boiling the finger-size cores of the bamboo shoots, but it is worth the effort for this seasonal delicacy.
 |
| Redbud pickles (Photo by bodhilens) |
Virginia let me pick blossoms on her old and gorgeous redbud trees in her yard. I just rinsed the blossoms with water, air-dry them, and pickled them in apple cider vinegar and a table spoonful of raw honey for a couple of hours. We poured a few spoonfuls from the jar over mixed commercial and wild greens (lettuce, carrots, tomatoes, and chickweed) and sprinkled a little salt and pepper. The salad was so tasty and refreshing that I ate two bowlfuls.
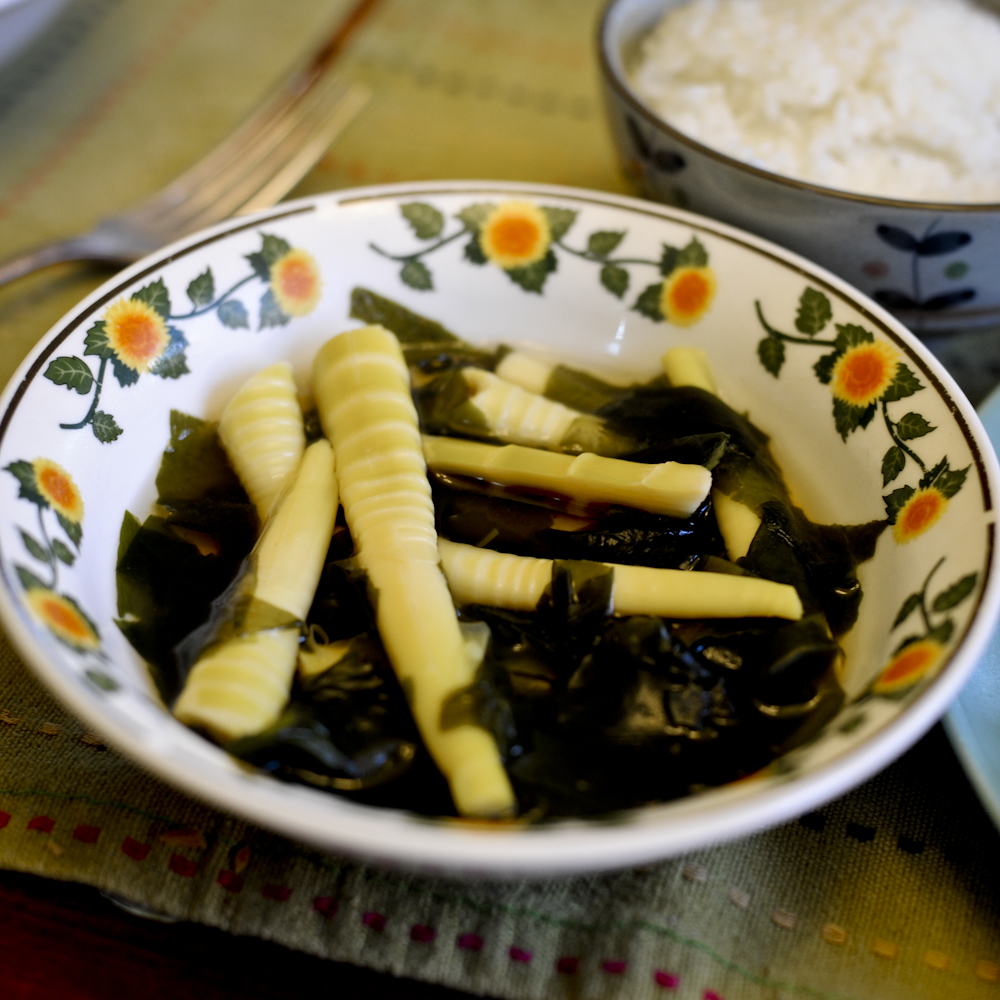 |
| Young bamboo shoots with "wakame" seaweeds (Photo by bodhilens) |
 |
| Ginger-flavored omelette with swiss chard and sweet mini peppers (Photo by bodhilens) |
Virginia's daughter Margaret shared with us very fresh farm eggs laid by her "girls" in her yard. I stir-fried swiss chard from Fox's garden and sweet mini peppers from Kroger with grated ginger in extra virgin canola oil, beat the eggs and poured in the pan, and seasoned the omelette with salt and pepper.
Oh, I forgot to mention that the chickweed in the salad also came from Margaret's yard. I gave the girls a bunch of chickweed in return for their eggs, and they went crazy over it and seemed to really love it. The common name of the plant totally made sense to me. Chickweed is ranked #3 on Top 10 Edible Plants in Your Yard and is actually very nutritious and healing to both humans and animals. Next time you think about weeding chickweed, think about tossing it in salad, soup, and feed.
Oh, I forgot to mention that the chickweed in the salad also came from Margaret's yard. I gave the girls a bunch of chickweed in return for their eggs, and they went crazy over it and seemed to really love it. The common name of the plant totally made sense to me. Chickweed is ranked #3 on Top 10 Edible Plants in Your Yard and is actually very nutritious and healing to both humans and animals. Next time you think about weeding chickweed, think about tossing it in salad, soup, and feed.
Thursday, March 29, 2012
Dandelion and violet flower honeys and vinegars
 |
| Dandelion and violet flower honeys (Photo by bodhilens) |
 |
| Dandelion and violet flower vinegars (Photo by bodhilens) |
Directions:
1. Select a glass jar that is a right size for the amount of your harvest.
(Ideally, fill a jar with flowers and honey to the top. I filled mine over a few days because I could only harvest a soup-bowl-full of flowers a day from my yard. Also, use a plastic lid or a parchment paper liner under a metal lid for vinegars.)
2. Pick flowers and rinse them with water to clean any dirt and small insects off.
(I usually just pour tap water in the bowl of flowers, stir for a minute, and scoop the flowers out in a strainer to drain.)
3. Air-dry flowers on a clean cloth.
(If flowers are dirt-free and/or you want to keep pollen, skip #2 and let small insects escape at #3.)
4. Sterilize the jar.
(I usually place a jar and a lid in a bowl and pour boiling water over them, carefully take them out on a clean cloth, and air-dry them.)
5. Put flowers in the sterilized jar and pour honey (preferably organic raw honey) or apple cider vinegar in. Use a clean chopstick to stir and make sure all flowers are mixed well with honey or vinegar.
6. Keep herbal honeys and vinegars in a dark place. Check everyday for a week or so and top off honey or vinegar to keep flowers mixed well with honey or vinegar. Enjoy consuming herbal honeys in 2-4 weeks, herbal vinegars in 4-6 weeks.
Here are some nice videos of Susan Weed making violet flower honey and dandelion flower vinegar. She explains that the medicinal properties of honey are "soothing and dissolving," and violet flower adds to the effects. Therefore, violet flower honey helps to heal bruises, minor burns, and sore throat. She also explains that vinegar extracts vitamins and minerals out of plants, and dandelion flower vinegar is especially good for digestion.
Last year I made and consumed quite a bit of dandelion leaf and root vinegar. It is even more nutritious and medicinal than the flower vinegar, and all the minerals extracted from the plant makes apple cider vinegar tastes mellower, which makes it perfect for salad dressing. The flower vinegar is prettier, though.
Friday, March 23, 2012
Recycling stale bread heals and baguettes

Ingredients
3-4 heels of bread or 10-12 slices of a small baguette (naturally stale or dried in a microwave)
2 TBSP of coconut oil and/or butter (melted)
1 TBSP of honey or sucanat
A pinch of stevia
1 TBSP of ginger (grated)
Directions
1. Cut bread into bites or slices.
2. Mix all the seasonings.
3. Coat the bread with the mixed seasonings well. (I use my hands.)
4. Place the seasoned bread pieces or slices on parchment paper and bake at 360F until they are golden-brown (about 20 minutes).
Thursday, March 22, 2012
Mystery wild plant in backyard
 |
| Mystery wild plant in backyard (Photo by gardenfairy) |
This is one of the wild plants in our backyard about which I have been curious for the past few years. The plant seemed to be biennial, considering that only its rosette base grew last year. I begged bodhilens to mow it around last spring so that I could find out what it is this spring. I initially thought it might be a kind of mullein because the forage was oval and velvety, then I wished it were white borage when someone at Garden Forums suggested that it might be a plant that belongs to the family of Boraginacease. When the flowers bloomed, however, it became obvious that they were neither mullein nor borage but appeared to belong to the genus of Erigeron in the family of Asteraceae, most likely Eastern daisy fleabane or Philadelphia fleabane.
 |
| Eastern daisy or Philadelphia fleabane (Photo by bodhilens) |
According to some online sources, the name "fleabane" came from the belief that the dried plants repelled fleas, and people used to hang the dried plants in barns. We seem to have lost the wisdom, but birds, particularly starlings, still line their nests with the plants to repell mites.
Tuesday, January 17, 2012
Meatless meatballs & mung bean sprouts and pickled red ginger salad
 |
| Photo by bodhilens |
Meatless meatballs (for 4 servings)
Ingredients:
1 pack of mushrooms (portabella or white)
2 cups of walnuts
1 tsp of soy sauce, 1 tsp of olive oil, and 1 clove of garlic (for marinating mushrooms)
1 tsp of thyme
1 tsp of oregano
1 TBSP of fresh parsley (or 1 tsp of dry parsley)
2 cloves of garlic
1/2 tsp of natural salt
2 small pieces of "taka no tsume" (or any other kinds of red hot chili peppers)
1-2 TBSP of olive oil (for consistency)
1 TBSP of canola oil (or any other kinds of oil of your choice for pan-frying)
Need a food processor and your favorite meatball sauce (e.g., sweet and sour sauce, BBQ sauce, soy sauce with "mirin" [rice wine sweetener], and tomato sauce).
Directions:
1. Soak walnuts in water for 1 hour or longer.
2. Marinate mushrooms in soy sauce, grated garlic, and olive oil for 1 hour or longer.
3. Put #1 and #2 in a food processor. Add all the seasonings and 1 TBSP of olive oil in. Run the food processor until the mixture turns into the right consistency for meatballs. Add another TBSP of olive oil if necessary.
4. Take 1 tsp of the mixture and make a small piece of meatball. (The mixture is softer and looser than regular meatballs, so a large piece tends to crumble. )
5. Pan-fry the meatballs with 1 TBSP of oil of your choice until they are brown.
6. Pour a sauce of your choice over the meatballs.
Mung bean sprouts and pickled red ginger salad (for 4 servings)
Mung bean sprouts (4 TBSP of mung beans sprouted to almost fill a quart jar. See the directions here.)
1 TBSP of "beni shoga" (pickled red ginger)
1 TBSP of Japanese mayonnaise
Need a large bowl.
Directions:
1. Put the sprouts in boiling water for 30 seconds and drain.
2. In a large bowl, mix the blanched sprouts with pickled red ginger and Japanese mayonnaise.
Sunday, January 8, 2012
Cauliflower and potato sabzi and germinated brown rice with azuki beans
 |
| Photo by bodhilens |
I used to know only one way to eat cauliflower: baked cauliflower with cheesy white sauce. I did not like it very much, so I rarely ate cauliflower. However, since I learned about the high nutritional value of cauliflower, I have been trying out different recipes. This cauliflower and potato stir-fly is called "aloo gobhi sabzi" by Indian people. It is simple but flavorful with spices.
When brown rice is germinated (called "hatsuga genmai" in Japanese), it is tastier (because starch and protein are converted into sugar and "umami"), easier for our bodies to digest (because the hard cell gets broken, and phytic acid is reduced), and more nutritious (because some nutrients, including GABA, increase in amount or become more readily available to our bodies, and additional nutrients are developed). Azuki beans help to activate even more enzymes in this rice dish called "hatsuga koso genmai (germinated enzyme-enriched brown rice)," one of the nutritionally near-perfect foods about which Japanese people rave.
Cauliflower and potato sabzi
Ingredient (for 6 servings):
1 head of cauliflower
2 medium-size or 3 small-size potatoes
1 small-size onion
1 TBSP of coconut oil (ghee, butter, or olive oil)*
2 TBSP of fresh ginger
2 cloves of garlic
1 tsp of tarmelic
1 tsp of cumin
1 tsp of natural salt
1/2 tsp of cayenne pepper
Directions:
1. Grate ginger and garlic and chop onion finely.
2. Heat oil in a frying pan and stir-fry #1 until onion looks transparent.
3. Wash and cut potatoes and cauliflower into small cubes/florets.
4. Add potato cubes in the pan and stir-fry and steam-cook them with a lid until they are almost fully cooked.
5. Add cauliflower florets in the pan and stir-fry and steam-cook them with a lid until they are almost fully cooked. (By this time, potatoes should be golden brown and soft.)
6. Add all seasonings in the pan, mix everything well, and continue to cook until cauliflower is done.
*Ghee is tasty and is often used for Indian dishes, but coconut oil (organic, extra virgin, and cold-pressed) is the healthiest when being cooked in high heat. Olive oil (organic, extra virgin, and cold-pressed) loses its health benefits when being cooked in high heat, so it is better saved for salad dressing, drizzling over pasta, or dipping bread in. Here is a great fat debate online, if you are interested.
Germinated brown rice with azuki beans
Ingredients (for 6 servings):
3 cups of brown rice (preferably organic)
1/2 cup of azuki beans (preferably organic)
1/2 tsp of natural salt
Filtered water
Need a strainer, a large bowl, a whisk, and a rice cooker.
Directions (to serve for supper next day):
1. On the previous night, quickly rinse brown rice and azuki beans in running water (If not organic, wash them more thoroughly).
2. Put the rice and beans in a large bowl, and add filtered water until the rice and beans are submerged in water.
3. With a whisk, beat the rice and beans slowly for several minutes until the water gets cloudy.
4. Boil a cup of filtered water and add it slowly to the bowl until the water in the bowl gets lukewarm. Soak the rice and beans in lukewarm filtered water for 24 hours (Lukewarm water accelerates their germination processes).
5. Drain and air-dry the rice and beans for a while. (Just leave them wet in bowl for several hours, which further facilitates their germination processes. You do not see them sprouting, but the germ of brown rice may look more plump and white, and azuki beans should also look more plump and lighter in color.)
6. Put the germinated rice and azuki beans in a rice cooker, pour filtered water up to the water measurement line for 4 cups of rice, and start cooking.
7. After the cooking time is up, keep the lid on for 15 more minutes for some steaming effect. After 15 minutes, open the lid and stir up the cooked germinated brown rice with azuki beans well, and put the lid back and keep it warm until it is served.*
*Some people suggest that the longer you let this germinated brown rice with azuki beans rest in a keep-warm setting, the more enzymes it develops (because it begins to ferment) and the tastier it gets. I am not sure about the biochemistry of enzymes, but in my experience, it tasted best after being kept warm no longer than an hour or so.
Subscribe to:
Posts (Atom)